
donka
iPF Novice
The TripMate Nano from HooToo is one of those multifunctional devices that you didn't realise you needed until you tried it. This is essentially a tiny, travel wireless n router that can turn an existing ethernet connection into a Wireless one, allow multiple wireless clients to connect or to wirelessly share files from a USB source. It can also be used to extend an existing WiFi connection.
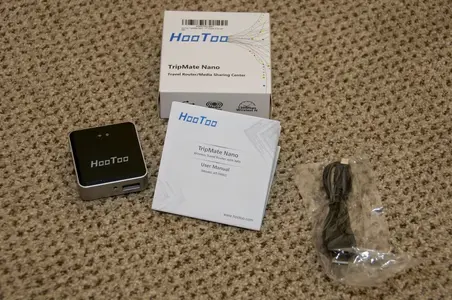
In the box you will find the TripMate Nano, a user manual and a micro USB cable which is used to supply power. The TripMate is manufactured from plastic and measures in at 51mm x 56mm and sits 18mm tall - all wrapped up in a package weighing only 82g.
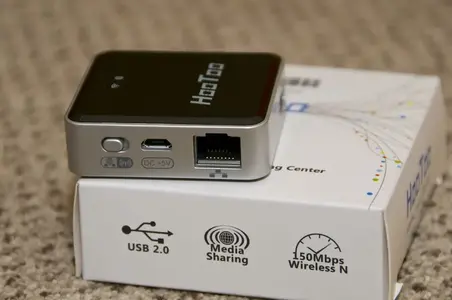
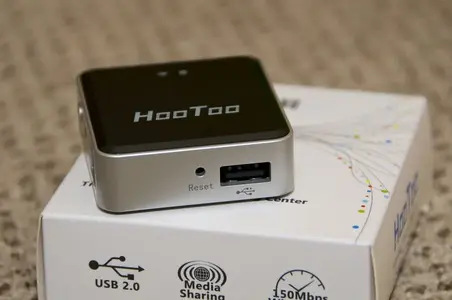
On top are two LEDs, one blue to indicate the unit is powering up and when available and one green to indicate if it is connected to the Internet. On the front is a handy reset button alongside a USB port for sharing the content of any connected USB drive. On the left you will find a switch to alternate between the source network of Ethernet or Wireless as well as a micro USB port for power and an Ethernet port for connecting to a wired network. Thoughtfully, on the underside is a white label that holds relevant information relating to default user name, Wifi password and IP address - you can literally plug this in and get connected without the need to look to the user manual. Speaking of which, the manual is excellent, being both detailed and also well illustrated.
Once powered on, you connect to the TripMate via it's Wifi network. When you select this Wifi network, you just need to plug in the default security key of '11111111' and you are now connected. As this point, you will have a few options depending on how you wish to use the TripMate. If you are extending a wired network that you are connected to via Ethernet, you will now have access to this and if you have a USB drive plugged into the TripMate, you will now be able to access that content. If you wish to connect the TripMate to a Wireless network, you will most likely need to administrate this to select the correct Wifi and enter any required password and this can be done via the built in web server or the app if you are using the likes of iOS or Android.
In my testing, I used the iOS app on my iPad to access a thumb drive of content and the app performed very well with instant access and quick navigation. The app lets you manage files on the connected USB drive such as deleting, downloading to your device or playing them back. For video files, the app only supports the normal Apple supported formats such as mp4 which play back instantly, for other formats, it will prompt you to open in another app. You also have the option of browsing your device and uploading the likes of images and videos from the camera roll to the connected USB drive which is a great way of backing up images when travelling.
The app also supports a settings panel which lets you do some limited actions such as renaming your wireless connection, changing security options and upgrading the firmware. You can also use the settings to set up a connection to an existing Wifi network.
The TripMate supports both uPNP/DNLA and Samba sharing which is great for using third party apps that support these methods. I used my video playing app of choice, nPlayer which has great network support, to connect to the TripMate. This lets me browse the contents of a connected USB drive and stream back practically any video format regardless of whether it is officially supported by Apple.
You also have the option of using any web browser to connect to the TripMate's built in web server by simply tapping in the IP address of 10.10.10.254 into the URL bar. This gives you full access to the TripMate allowing you to administrate things such as user names and passwords, get connected USB drive information, manage network connections, enable or disable the file sharing options and system options such as backing up settings or upgrading the firmware.
While the included user manual is good, I recommend going onto the HooToo website for some extensive PDF guides for the various Smartphone apps as well as the main unit itself.
I've used similar products that are battery powered making them both larger and heavier and don't include an Ethernet port. The TripMate nano requires power but means it is a lot smaller and lighter and due it's requirement for a tethered power connection, adding an optional Ethernet port makes sense. Any USB port can be used as a power supply so a USB wall charger or laptop can be used but you also have the option of using a battery power bank if you will be on the go without access to another power source so you don't need to lose out on any flexibility when out and about. It's a great tool for the traveller who may be holed up in a hotel room with only an Ethernet connection or even for sharing USB content round at a friend's house and it is easy to pair it with a car USB charger to give you a Wifi connection to share media content with the family on a road trip. The name TripMate is very apt here and if you can think of a use for it, the nano is a great gadget to have with you.
I got this from http://www.amazon.co.uk/HooToo-TripM...+tripmate+nano
Video review:
In the box you will find the TripMate Nano, a user manual and a micro USB cable which is used to supply power. The TripMate is manufactured from plastic and measures in at 51mm x 56mm and sits 18mm tall - all wrapped up in a package weighing only 82g.
On top are two LEDs, one blue to indicate the unit is powering up and when available and one green to indicate if it is connected to the Internet. On the front is a handy reset button alongside a USB port for sharing the content of any connected USB drive. On the left you will find a switch to alternate between the source network of Ethernet or Wireless as well as a micro USB port for power and an Ethernet port for connecting to a wired network. Thoughtfully, on the underside is a white label that holds relevant information relating to default user name, Wifi password and IP address - you can literally plug this in and get connected without the need to look to the user manual. Speaking of which, the manual is excellent, being both detailed and also well illustrated.
Once powered on, you connect to the TripMate via it's Wifi network. When you select this Wifi network, you just need to plug in the default security key of '11111111' and you are now connected. As this point, you will have a few options depending on how you wish to use the TripMate. If you are extending a wired network that you are connected to via Ethernet, you will now have access to this and if you have a USB drive plugged into the TripMate, you will now be able to access that content. If you wish to connect the TripMate to a Wireless network, you will most likely need to administrate this to select the correct Wifi and enter any required password and this can be done via the built in web server or the app if you are using the likes of iOS or Android.
In my testing, I used the iOS app on my iPad to access a thumb drive of content and the app performed very well with instant access and quick navigation. The app lets you manage files on the connected USB drive such as deleting, downloading to your device or playing them back. For video files, the app only supports the normal Apple supported formats such as mp4 which play back instantly, for other formats, it will prompt you to open in another app. You also have the option of browsing your device and uploading the likes of images and videos from the camera roll to the connected USB drive which is a great way of backing up images when travelling.
The app also supports a settings panel which lets you do some limited actions such as renaming your wireless connection, changing security options and upgrading the firmware. You can also use the settings to set up a connection to an existing Wifi network.
The TripMate supports both uPNP/DNLA and Samba sharing which is great for using third party apps that support these methods. I used my video playing app of choice, nPlayer which has great network support, to connect to the TripMate. This lets me browse the contents of a connected USB drive and stream back practically any video format regardless of whether it is officially supported by Apple.
You also have the option of using any web browser to connect to the TripMate's built in web server by simply tapping in the IP address of 10.10.10.254 into the URL bar. This gives you full access to the TripMate allowing you to administrate things such as user names and passwords, get connected USB drive information, manage network connections, enable or disable the file sharing options and system options such as backing up settings or upgrading the firmware.
While the included user manual is good, I recommend going onto the HooToo website for some extensive PDF guides for the various Smartphone apps as well as the main unit itself.
I've used similar products that are battery powered making them both larger and heavier and don't include an Ethernet port. The TripMate nano requires power but means it is a lot smaller and lighter and due it's requirement for a tethered power connection, adding an optional Ethernet port makes sense. Any USB port can be used as a power supply so a USB wall charger or laptop can be used but you also have the option of using a battery power bank if you will be on the go without access to another power source so you don't need to lose out on any flexibility when out and about. It's a great tool for the traveller who may be holed up in a hotel room with only an Ethernet connection or even for sharing USB content round at a friend's house and it is easy to pair it with a car USB charger to give you a Wifi connection to share media content with the family on a road trip. The name TripMate is very apt here and if you can think of a use for it, the nano is a great gadget to have with you.
I got this from http://www.amazon.co.uk/HooToo-TripM...+tripmate+nano
Video review:
Attachments
Last edited: