
Xilisoft iPad Magic Tutorial
This article will tell you how to transfer movies and music between iPad and your computer, copy iPad contents to iTunes, convert and transfer incompatible videos/audios/CD/DVD/ISO images/IFO folder to iPad, and share files among multiple devices with Xilisoft iPad Magic.
This guide includes 6 parts:
Tip: The program supports connecting iPad, iPod, iPhone and iPod touch simultaneously and sharing files among them.

Part 1: Import supported media files to iPad
Tips:
1. You can also right click the library/playlist, and choose "Add File(s) to List" or "Add Folder to List" option to import the files you want to add.
2. If you have connected multiple devices and want to transfer the files to them simultaneously, then first click "Video/Audio" node in the left tree and load the files you want to the list, then check the files you want to import and click the "Export Checked Files to Device" button, then the "Select Copy Destination" dialog will pop up to ask you to choose the target devices you want to copy to. Check the devices you want, and click "OK" to start importing the files to your checked devices simultaneously.
Part 2: Backup iPad files to your computer
Step 1: Open a library/playlist, and check the files you want to export.
Step 2: Click "Export Checked Files to Local Folder" drop-down button, then choose "Export to Local" option, then select the folder for saving the checked files in the dialog that opens to start exporting.
Tip: You can also right click the checked files, and choose "Export to Local" option to start exporting the files to the folder you want.
Part 3: Copy iPad files to iTunes library
Step 1: Open a library/playlist, and check the files you want to export.
Step 2: Click "Export Checked Files to iTunes" button, then iTunes opens and the program starts exporting the files to iTunes.
Tip: You can also right click the checked files, and choose "Export to iTunes" option to start exporting the files to the folder you want.
Part 4: Copy DVD movies to iPad/iTunes direcly
Step 1: Insert a DVD movie disc you want to copy.
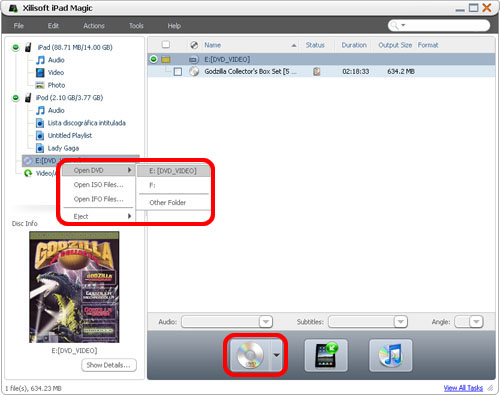
Step 2: Choose the DVD/CD node in the left tree, and click "Open DVD" drop-down button on the bottom, then choose the inserted DVD disc from the drop-down list, or choose a DVD folder, ISO file or IFO file on your local disk, then load them into the list.
Tip: You can also right click the DVD/CD node in the left tree, click "Open DVD" and choose the inserted DVD disc, or click "Open DVD > Other Folder" to choose a DVD folder, or click "Open ISO Files..." or "Open IFO Files..." to load the ISO or IFO files you want to import.
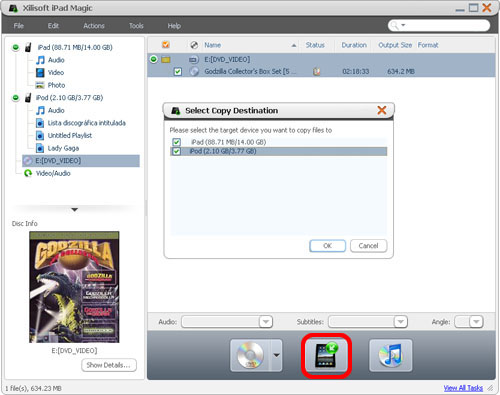
Step 3: Check the files you want to import in the list, and click "Export Checked Files to Device" or "Export Checked Files to iTunes" button to copy them to your iPad/iPhone or iTunes library.
Tip:
1. If you have connected multiple devices, then after you click the "Export Checked Files to Device" button, the "Select Copy Destination" dialog will pop up to ask you to choose the target devices you want to copy files to. Check the devices you want, and click "OK" to start copying these files to your checked devices simultaneously.
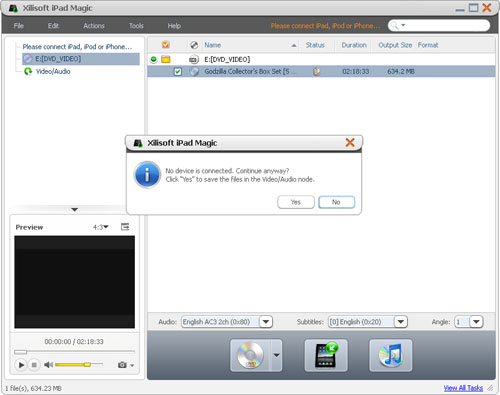
2. If you didn't connect any device, then after you click the "Export Checked Files to Device" button, the application will prompt you that no device is connected. Click "Yes" to continue ripping DVD movie and save the converted media files in the Video/Audio node for later operation, and click "No" to cancel importing DVD movie.
Part 5: Convert and transfer incompatible media files to iPad/iTunes
Step 1: Click the Video/Audio node in the left tree.
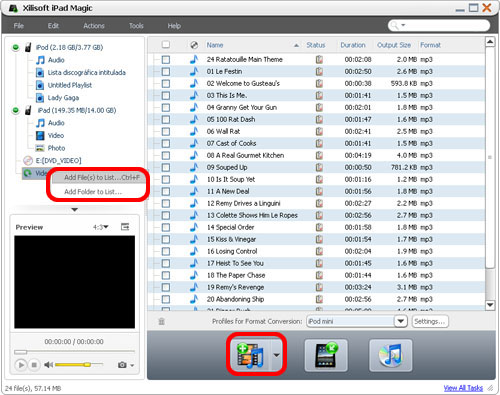
Step 2: Click the "Add File(s) to Device" drop-down button on the bottom, choose the "Add File(s) to List..." option, and select the files you want in the dialog that opens to add them to the list. Or choose the "Add Folder to List..." option to locate the folder you want and import all the files in the folder to the list.
Tip: You can also right click the Video/Audio node, and choose "Add File(s) to List..." or "Add Folder to List..." option to add the files you want.
Step 3: Check the files you want in the list, and click "Export Checked Files to Device" or "Export Checked Files to iTunes" button to copy the files into your iPad/iPhone or iTunes library.
Tip:
1. If you have connected multiple devices, then first click "Video/Audio" node and load the files you want to the list, then check the files you want to import and click the "Export Checked Files to Device" button, then the "Select Copy Destination" dialog will pop up to ask you to choose the target devices you want to copy to. Check the devices you want, and click "OK" to start importing these files to your checked devices simultaneously.
2. If you didn't connect any device, then the application will prompt you that no device is connected. Click "Yes" to continue converting the files and save the converted media files in the Video/Audio node for later operation, and click "No" to cancel adding the files.
Part 6: Share files among multiple devices
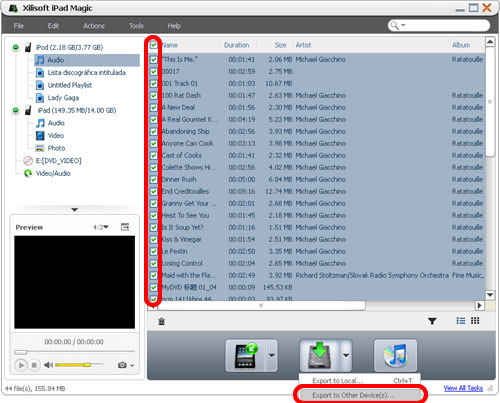
Step 1: In the left tree list, open a library/playlist in one of the connected devices, and then check the files you want to copy.
Step 2: Click "Export Checked Files to Local Folder" drop-down button, then choose "Export to Other Device(s)..." option to start exporting the files. Or you can right click the checked files and choose "Export to Other Device(s)..." option to start transferring the files to other devices.
This article will tell you how to transfer movies and music between iPad and your computer, copy iPad contents to iTunes, convert and transfer incompatible videos/audios/CD/DVD/ISO images/IFO folder to iPad, and share files among multiple devices with Xilisoft iPad Magic.
This guide includes 6 parts:
- Part 1: Import supported media files to iPad
- Part 2: Backup iPad files to your computer
- Part 3: Copy iPad files to iTunes library
- Part 4: Copy DVD movies to iPad/iTunes
- Part 5: Convert and Transfer incompatible media files to iPad/iTunes
- Part 6: Share files among multiple devices
Tip: The program supports connecting iPad, iPod, iPhone and iPod touch simultaneously and sharing files among them.
Part 1: Import supported media files to iPad
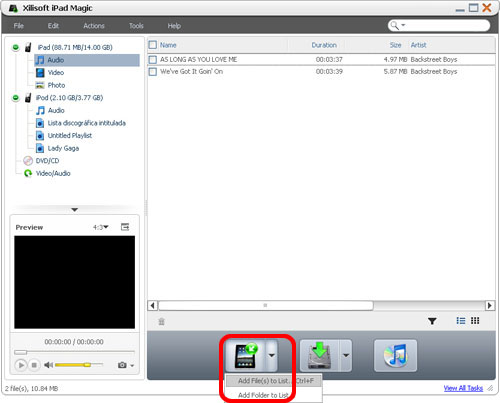
Step 1: Open the library/playlist that you want to import.
Step 2: Click the "Add File(s) to Device" drop-down button on the bottom, choose the "Add File(s) to List" option, and select the files you want in the dialog that opens then import them to your iPad, or choose the "Add Folder to List" option to locate the folder you want and import all the files in the folder to the list.Tips:
1. You can also right click the library/playlist, and choose "Add File(s) to List" or "Add Folder to List" option to import the files you want to add.
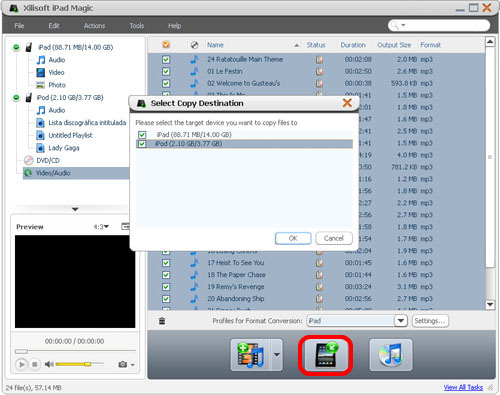
2. If you have connected multiple devices and want to transfer the files to them simultaneously, then first click "Video/Audio" node in the left tree and load the files you want to the list, then check the files you want to import and click the "Export Checked Files to Device" button, then the "Select Copy Destination" dialog will pop up to ask you to choose the target devices you want to copy to. Check the devices you want, and click "OK" to start importing the files to your checked devices simultaneously.
Part 2: Backup iPad files to your computer
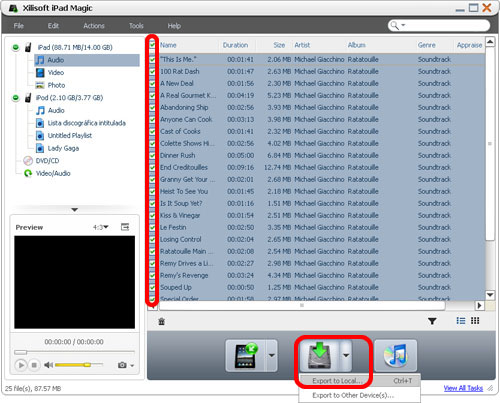
Step 1: Open a library/playlist, and check the files you want to export.
Step 2: Click "Export Checked Files to Local Folder" drop-down button, then choose "Export to Local" option, then select the folder for saving the checked files in the dialog that opens to start exporting.
Tip: You can also right click the checked files, and choose "Export to Local" option to start exporting the files to the folder you want.
Part 3: Copy iPad files to iTunes library
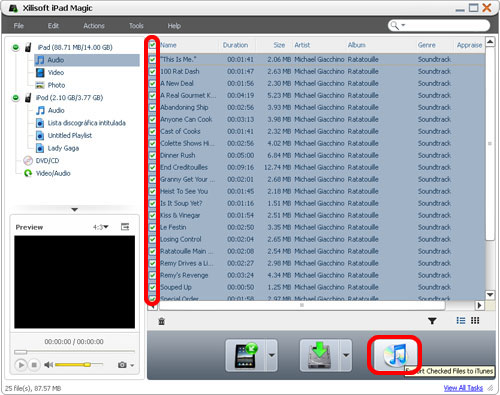
Step 1: Open a library/playlist, and check the files you want to export.
Step 2: Click "Export Checked Files to iTunes" button, then iTunes opens and the program starts exporting the files to iTunes.
Tip: You can also right click the checked files, and choose "Export to iTunes" option to start exporting the files to the folder you want.
Part 4: Copy DVD movies to iPad/iTunes direcly
Step 1: Insert a DVD movie disc you want to copy.
Step 2: Choose the DVD/CD node in the left tree, and click "Open DVD" drop-down button on the bottom, then choose the inserted DVD disc from the drop-down list, or choose a DVD folder, ISO file or IFO file on your local disk, then load them into the list.
Tip: You can also right click the DVD/CD node in the left tree, click "Open DVD" and choose the inserted DVD disc, or click "Open DVD > Other Folder" to choose a DVD folder, or click "Open ISO Files..." or "Open IFO Files..." to load the ISO or IFO files you want to import.
Step 3: Check the files you want to import in the list, and click "Export Checked Files to Device" or "Export Checked Files to iTunes" button to copy them to your iPad/iPhone or iTunes library.
Tip:
1. If you have connected multiple devices, then after you click the "Export Checked Files to Device" button, the "Select Copy Destination" dialog will pop up to ask you to choose the target devices you want to copy files to. Check the devices you want, and click "OK" to start copying these files to your checked devices simultaneously.
2. If you didn't connect any device, then after you click the "Export Checked Files to Device" button, the application will prompt you that no device is connected. Click "Yes" to continue ripping DVD movie and save the converted media files in the Video/Audio node for later operation, and click "No" to cancel importing DVD movie.
Part 5: Convert and transfer incompatible media files to iPad/iTunes
Step 1: Click the Video/Audio node in the left tree.
Step 2: Click the "Add File(s) to Device" drop-down button on the bottom, choose the "Add File(s) to List..." option, and select the files you want in the dialog that opens to add them to the list. Or choose the "Add Folder to List..." option to locate the folder you want and import all the files in the folder to the list.
Tip: You can also right click the Video/Audio node, and choose "Add File(s) to List..." or "Add Folder to List..." option to add the files you want.
Step 3: Check the files you want in the list, and click "Export Checked Files to Device" or "Export Checked Files to iTunes" button to copy the files into your iPad/iPhone or iTunes library.
Tip:
1. If you have connected multiple devices, then first click "Video/Audio" node and load the files you want to the list, then check the files you want to import and click the "Export Checked Files to Device" button, then the "Select Copy Destination" dialog will pop up to ask you to choose the target devices you want to copy to. Check the devices you want, and click "OK" to start importing these files to your checked devices simultaneously.
2. If you didn't connect any device, then the application will prompt you that no device is connected. Click "Yes" to continue converting the files and save the converted media files in the Video/Audio node for later operation, and click "No" to cancel adding the files.
Part 6: Share files among multiple devices
Step 1: In the left tree list, open a library/playlist in one of the connected devices, and then check the files you want to copy.
Step 2: Click "Export Checked Files to Local Folder" drop-down button, then choose "Export to Other Device(s)..." option to start exporting the files. Or you can right click the checked files and choose "Export to Other Device(s)..." option to start transferring the files to other devices.